
Featured Craftsman: Ron Light -Lighthouse Woodworking
A blog for Amuse Art Fair, May 21 2016
Cutting, shaping, sanding, and finishing natural wood into something functional and beautiful takes time, and as such I find myself in my workshop at Lighthouse Woodworking at 9:00 am Monday through Saturday; I'll turn the lights off at 5:00 pm most days. And Sundays we take the time to worship, relax, read, and rest.
The workshop is located in a stand-alone, three-car garage that boasts its own heating, cooling, and ventilation system, 1 ½ baths, a separate room for applying finish, and a showroom on the second floor. It's a fifteen second walk from our back door to the shop, in and of itself a blessing. If I ever need to lift my mood, I turn on the radio and listen to the traffic report coming out of Northern Virginia!
So….why wood? I love the smell, feel, and look of wood. Every wood species has its own characteristics: color, workability, specific gravity, hardness, ability to hold fasteners, and so on. Worldwide, there are thousands of tree species; most of the furniture I build, however, is made from North American hardwoods local to the Shenandoah Valley. These include walnut, soft and hard maple, poplar, hickory, and cherry.
Few people seem to understand what it takes to build a piece of furniture out of solid wood. Apart from learning and perpetuating the skills needed to be
a woodworker, I find I am often educating people on the steps involved in turning raw wood into something useful. It all starts with a tree….
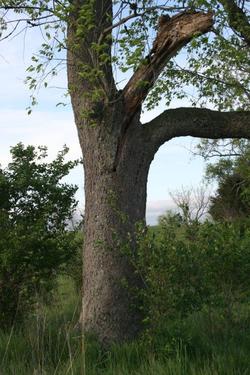
Left: This black cherry tree grows on our property, within view of my shop. I would guess that it is 75-95 years old. It's not perfect, and that's the first lesson in working with wood: from the tree to the board, wood is not perfect. My cherry tree is subject to drought, disease, a seemingly endless onslaught of indigenous and imported bugs (ash trees are being decimated as I write this by a non-native insect called the Emerald Ash Borer), gunshots, nails, screws, and fence wire. If a tree manages to survive these maladies, the amount of useful wood out of the typical log is often low, with a waste factor of 50% or more.
But…with a sound log, somewhat straight, and of a good diameter, good wood can be found. These days, it's often milled on a portable sawmill, using a
blade that is a mere 1/16" of an inch thick, minimizing the waste from the blade's kerf. To the unbeliever this will sound quite strange, but there
are few things as beautiful as a freshly cut plank sawed from a log. Every log is different, and just as Mr. Gump once said, you never know what
you're going to get. Simply stated, wood is beautiful. It's a joy to be able to do what I do.
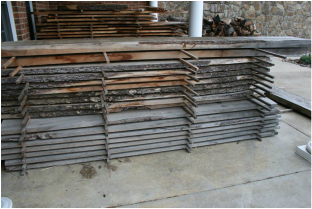
Right: Milled cherry, ready for use. This wood has air-dried for several years. It takes about a year to dry a board that is 1" thick, two years to dry a board that is 2" thick, and so on. The boards in the center of this pile are "live edge", meaning we left the tree's bark and natural profile intact. The pieces of wood separating each layer of boards are called stickers.
Once the wood is milled into boards and dried, it is ready for use. Well, at least it is ready to be brought into the shop. There I remove any defects developed during the drying process, such as warp, twist, cupping, fungal growth, and so on. There is more loss at this stage….and still no furniture to show for it!
Sound wood is jointed (the process of flattening one face, and one edge of the board 90 degrees to that face, on a machine called a jointer), planed (the
process of milling the wood to the correct thickness on a machine called a planer), and then cut to the correct width and length with various saws, both
hand and machine. Energy is consumed throughout the process: mine and the utility grid's. More waste can occur even after this processing; overnight the
natural stresses in a freshly milled board can cause undesirable twisting and cupping. When wood is dried in a kiln (think baking the wood in a large oven
to drive out the moisture) these stresses are eased, but kiln drying won't guarantee wood won't behave in an odd way.
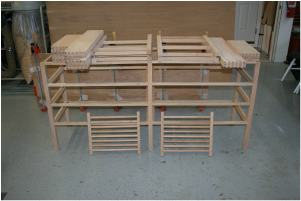
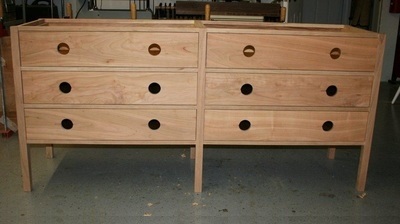
Left: Components for a cherry dresser, and two cherry nightstands. An error in any single component can throw off the entire assembly; making furniture requires a clear head and some degree of patience!
We're now close to having something put together that resembles "furniture." In a typical dresser, there may be dozens of components and dozens more operations that were performed to join these components into a solid whole.
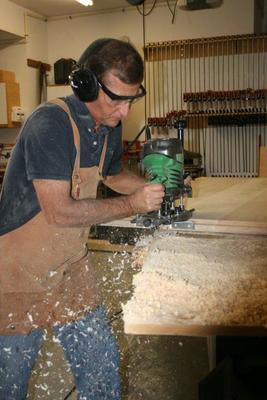
With the components machined and tested for fit, now comes the task responsible for most carpal tunnel syndrome problems woodworkers experience: sanding. It
is not uncommon for a woodworker to spend hours, even days, sanding wood. While the task is somewhat mindless, a lot can go wrong: fail to sand every piece
of wood to the same degree, through the same grits of sandpaper (I start with 100 grit, move to 120 grit, and usually progress through 180 or 220 grit), and
the mistake will telegraph through the wood when finish is applied. (Even with all this sanding, it's still a joy to do what I do!)

When all components are sanded, and then assembled, we finally have "furniture".
Left: The cherry dresser, nearing final assembly. Right: The cherry nightstands, without drawers.
"Finishing" the furniture is the next major task. In this context, "finishing" means applying some kind of substance to the wood to protect it and enhance
its beauty. There are literally hundreds of finishing choices on the market, from natural beeswax, to highly engineered polyurethanes and oils. Some
finishes are not compatible with others (think oil and water), and some are best applied with a spray gun or other means. I prefer a Danish oil product
to awaken the natural beauty of the wood, and once the oil has cured for 72 hours, wipe-on polyurethane. I usually apply three coats of poly to the
furniture case, and six coats to the tops. And….I sand between each coat of poly.
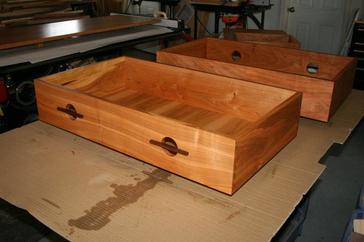
A pair of cherry dresser drawers with Danish oil, and three coats of polyurethane.
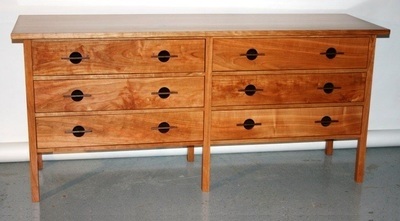
Left: The completed cherry dresser. For scale, the top is 22” wide by 72” long.
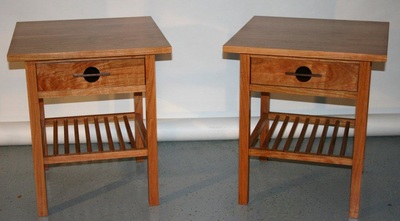
Right: The completed pair of cherry nightstands. The tops are 22” square.
I've walked you through the construction of a relatively simple dresser and nightstand commission, probably two to three weeks of work. Masters of the craft will easily spend six months on an elaborate 18th century secretary or knee hole desk. Furniture size and complexity dictate the effort required; however, even the simplest of projects takes time to do well. And it all starts with a tree!